Planning Center
Display your order of service, stage plots, and stage layouts on backstage and green room screens. DisplayCache automatically selects the next upcoming service plan from Planning Center Services, so your screens always show the right plan without manual switching.
- A Planning Center account with access to Planning Center Services
- A Personal Access Token (App ID and Secret) created at api.planningcenteronline.com/oauth/applications
- Admin role in DisplayCache
Connecting Planning Center
- Go to Integrations in the DisplayCache web admin and click Planning Center.
- Open api.planningcenteronline.com/oauth/applications in a new tab and create a new Personal Access Token.
- Copy the App ID and Secret from Planning Center.
- Paste them into the connection form in DisplayCache and click Connect.
- DisplayCache will test the connection automatically. If successful, you will see a "Connected" badge and your service types will load.
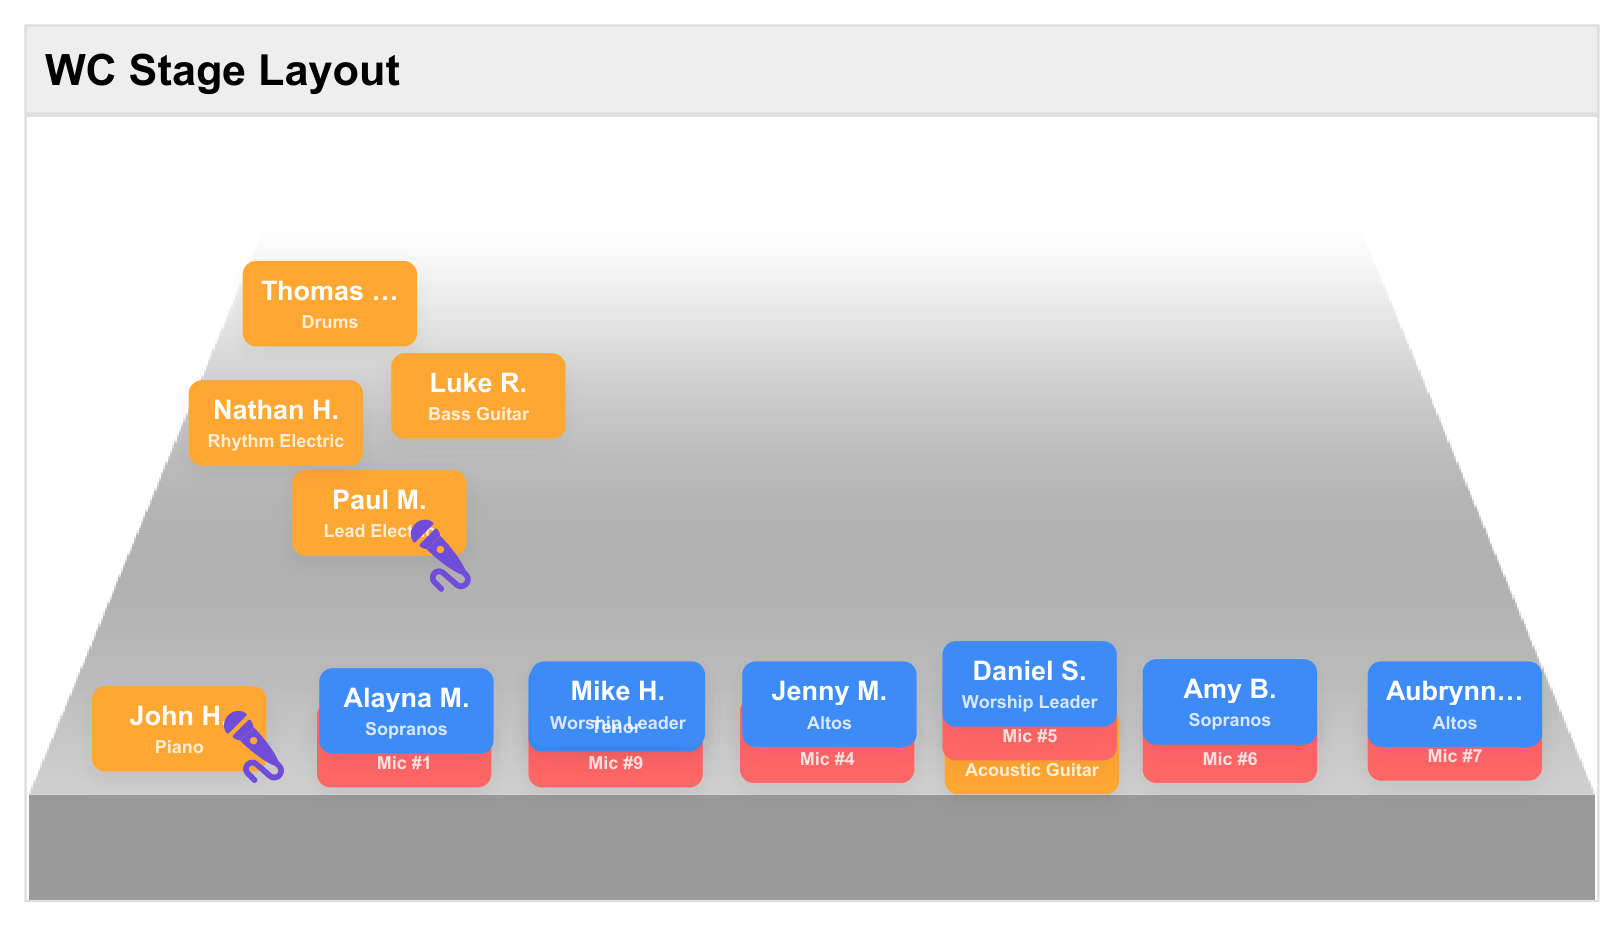
Stage Layout on the Screen
Here's an example of a synced Planning Center stage layout displaying live on a green-room screen. Team assignments and positions update automatically — no exporting, no laptop carts, no IT volunteer in the loop.
Creating a Display
- Once connected, click Add Display.
- Choose a Display Type:
- Order of Service — the full service plan with items, sequences, and durations.
- Stage Plot — team member positions with photos and roles. Filter by team (Worship, Vocals, Tech) to scope which assignments show.
- Stage Layout — the visual stage diagram you build in Planning Center (with positions, instruments, and assigned team members), pulled in as an image and rendered full-screen for your green-room monitors.
- Select a Service Type from the dropdown (e.g., "Sunday Morning", "Wednesday Night"). DisplayCache automatically picks the next upcoming plan for that service type.
- Click Sync to generate the display content.
- Add the synced content item to a playlist or assign it directly to a device.
Configuration Options
| Option | Values | Description |
|---|---|---|
| Layout | Single Column, Two Columns, Three Columns | How the order of service items are arranged on screen. Two and three column layouts show more items at once. |
| Scroll Speed | Slow, Medium, Fast | How quickly the display auto-scrolls through items. |
| Show Sequences | On / Off | When enabled, sequence groupings (Pre-Service, Worship, Message, etc.) are shown as section headers. |
| Show Durations | On / Off | When enabled, the planned duration for each item is displayed. |
| Show Photos | On / Off | For stage plot displays, shows team member profile photos. |
How Content Appears on Displays
The order of service renders natively on screen with your service type name as the heading, the service date, and each item listed with its title, description, and optional duration. Stage plots show team members arranged with their names, roles, and photos. The content refreshes automatically every few minutes to pick up last-minute changes.
TouchPoint
Display birthdays, events, milestones, volunteer schedules, and custom data from your TouchPoint church management system. Data is rendered natively on screen with photos, badges, and rich formatting.
- A TouchPoint ChMS account with both the
DeveloperandAPIOnlyroles.Developercan be granted by any TouchPoint admin (Admin → Manage Users → Roles).APIOnlyis restricted and must be enabled by TouchPoint — open a support ticket requesting that theAPIOnlyrole be added to the account you will use for DisplayCache. Both roles are required because the/PythonAPIendpoint authorizes against both. - Your TouchPoint base URL (e.g.,
https://mychurch.tpsdb.com) - Username and password for that account (we use HTTP Basic auth against
/PythonAPI; Personal Access Tokens are not accepted on that endpoint) - Admin role in DisplayCache
Connecting TouchPoint
- Confirm the account you plan to use has both the
DeveloperandAPIOnlyroles in TouchPoint. IfAPIOnlyis not visible under Admin → Manage Users → Roles, email TouchPoint support and ask them to enable theAPIOnlyrole for that user — this typically takes one business day. - Go to Integrations → TouchPoint in the DisplayCache web admin.
- Enter your TouchPoint Base URL (the address you use to log in, e.g.,
https://mychurch.tpsdb.com). - Enter the TouchPoint username and password for that account. DisplayCache uses HTTP Basic auth against the TouchPoint
/PythonAPIendpoint, which does not accept Personal Access Tokens. - Click Connect TouchPoint. DisplayCache will save your credentials, auto-create a Personal Access Token for ongoing REST calls, and install the loader script in TouchPoint for you.
- Use Test Connection to verify everything is working.
That's it — the loader script and data scripts (Birthdays, Events, Milestones, Volunteers) are installed and kept up to date automatically. No manual paste needed.
Available Display Types
<!--DC_START--> JSON output format, how parameters work, and includes a complete example script you can copy and edit.
Creating a Display Output
- Click + Add Display in the TouchPoint integration page.
- Choose a Type (Birthdays, Events, Milestones, Volunteers, or Custom).
- Configure type-specific settings (see table below).
- Choose a Display Format, Size, and Layout.
- Click Sync to generate the content item.
- Add the content item to a playlist or assign it to a device.
Type-Specific Settings
| Type | Settings |
|---|---|
| Birthdays | Days ahead (7, 14, 30), filter by involvement ID or saved search name, opt-out extra value field, show profile pictures, show age. |
| Events | Days ahead (7, 14, 30, 60), location filter (comma-separated room names), max events. |
| Milestones | Days ahead (7, 14, 30, 60), filter by involvement ID or saved search, milestone types (birthdays, wedding anniversaries, baptism anniversaries, membership anniversaries, custom date), custom date field name, opt-out field, show photos, show age on birthdays. |
| Volunteers | Involvement ID (the volunteer involvement to pull from), days ahead (7, 14, 30), show empty slots, show profile pictures. |
| Custom | Script name (your custom Python script in TouchPoint), display title, custom parameters, column detection. Use "Detect Columns" to auto-detect the data structure from your script output. |
Display Formats
For Birthdays, Events, Milestones, and Custom:
Events also supports:
Volunteers has specialized formats:
All display types also support Size (Small, Medium, Large) and Layout (Single Column, Two Columns, Three Columns) configuration.
eSPACE
Display room schedules and upcoming event listings from your eSPACE facility management system. Mount a screen outside a room to show availability, or display all upcoming events in the lobby.
- An eSPACE account with API access
- Your eSPACE Organization Key (found in eSPACE under Settings > API Settings)
- Admin role in DisplayCache
Connecting eSPACE
- Go to Integrations → eSPACE in the DisplayCache web admin.
- Enter the eSPACE API URL (usually
https://app.espace.cool). - Enter your Organization Key from eSPACE Settings > API Settings.
- Select your Event Timezone (Eastern, Central, Mountain, Pacific, etc.).
- Click Connect eSPACE.
- Use Test Connection to verify the connection is working.
Creating a Display Output
- Click + Add Display.
- Give the display a name (e.g., "Lobby Events" or "Room 201 Schedule").
- Choose a Display Format:
- Event List — a scrolling list of upcoming events with times and locations. Best for lobby screens.
- Room Schedule — a single-room sign showing current availability, the current event, and upcoming events. Mount outside a room.
- Configure Rooms:
- All Rooms — shows events from every location, including rooms added in the future.
- Specific Rooms — select individual rooms from the list. Best for room schedule displays.
- Set the Time Period (today only, next 7 days, next 14 days, etc.) and Max Events.
- Click Sync to generate the content item.
Configuration Options
| Option | Values | Description |
|---|---|---|
| Display Format | Event List, Room Schedule | Event List scrolls through events. Room Schedule shows a focused single-room view. |
| Rooms | All Rooms or Specific Rooms | Filter events by location. "All Rooms" automatically includes future new rooms. |
| Time Period | Today only through Next 90 days | How far ahead to look for events. |
| Max Events | 1–200 | Maximum number of events to display. |
| Scroll Speed | Slow, Medium, Fast | Auto-scroll speed for Event List format. |
| Public Events Only | On / Off | When enabled, only public events are shown. Private events are hidden. |
| Size (Room Schedule) | Small, Medium, Large | Text size for room schedule displays. Large is readable from a distance. |
| Layout (Room Schedule) | Single Column, Two Columns | How events are arranged on room schedule displays. |
How Content Appears on Displays
Event List: A scrolling list showing event name, room, start time, and end time, grouped by date. Auto-scrolls at the configured speed.
Room Schedule: Shows the room name prominently, whether it is currently available or occupied, the current event (if any), and upcoming events for that room. Ideal for mounting on a wall outside a meeting room.
BoxCast / Stream Hub
Automate your live streaming workflow. When a broadcast goes live on BoxCast, assigned screens switch to the stream automatically. When it ends, they switch back to their regular content. Add countdown timers, configure multiple stream sources, and control show-before/show-after timing.
- A BoxCast account with API credentials (Client ID and Client Secret)
- Admin role in DisplayCache
Connecting BoxCast
- Go to Integrations → BoxCast in the DisplayCache web admin.
- Enter your BoxCast Client ID and Client Secret. These are available in your BoxCast account settings under API access.
- Click Connect.
- Once connected, you can browse your channels and broadcasts, and import recorded broadcasts as content items.
Setting Up a Stream Hub
The Stream Hub is configured on a per-schedule basis, not in the BoxCast integration page. This is how you tell specific devices to switch to a live stream when a broadcast starts.
- Go to Schedules in the web admin.
- Create a new schedule or edit an existing one.
- Add a schedule entry and set the Display Mode to Kiosk.
- In the stream hub configuration, add one or more Stream Sources:
- BoxCast — select a BoxCast channel. DisplayCache monitors it for live, upcoming, and recent broadcasts.
- YouTube Live — paste a YouTube Live URL or channel.
- Vimeo — paste a Vimeo Live URL.
- HLS — paste any HLS (.m3u8) stream URL.
- Configure timing:
- Show Before (hours) — how many hours before a scheduled broadcast to switch the screen. A countdown timer displays until the broadcast starts.
- Recent Hours — how long after a broadcast ends to keep showing it (the "show after" window), before switching back to regular content.
- Show Countdown — toggle the countdown timer on or off.
- Assign the schedule to the devices that should show the stream.
How It Works During a Broadcast
| State | What the Screen Shows |
|---|---|
| Before broadcast | If within the "show before" window, the screen switches to the stream hub and shows a countdown timer with days, hours, and minutes until the broadcast starts. |
| Live | The screen shows the live stream in full screen. The switch happens automatically when BoxCast reports the broadcast is live. |
| Just ended | If within the "recent hours" window, the stream stays on screen so latecomers can catch the end or so the post-service message is visible. |
| No broadcast | The screen returns to its regular schedule and playlist content. |
Importing Recorded Broadcasts
In the BoxCast integration page, browse channels and past broadcasts. Click Add as Content on any recorded broadcast to import it into your content library. You can then add it to playlists like any other content item.
OneDrive & SharePoint
Sync files from OneDrive personal folders, SharePoint document libraries, or Microsoft Teams channel files directly to your content library. PowerPoint, Word, and Excel files are automatically converted to images for display.
- A Microsoft account (personal, work, or school) with OneDrive or SharePoint access
- Admin role in DisplayCache
Connecting OneDrive
- Go to Integrations → OneDrive in the DisplayCache web admin.
- Click Connect OneDrive.
- You will be redirected to Microsoft to sign in and authorize DisplayCache with read-only access to your files.
- After authorization, you are redirected back to DisplayCache. A folder browser opens automatically.
Syncing a OneDrive Folder
- Click + OneDrive Folder to open the folder browser.
- Navigate through your OneDrive folders. You will see folder names and a preview of supported files in each folder.
- When you find the folder you want, click Select "[folder name]".
- The folder is added as a sync configuration. Give it a display name.
- Choose a Sort Order (Name A-Z, Name Z-A, Newest first, Oldest first).
- Click Sync Now to import the files into your content library.
Syncing SharePoint / Teams Files
- Click + SharePoint / Teams to open the SharePoint browser.
- Search for a SharePoint site by name. Teams channels store their files in SharePoint sites, so search for your team name.
- Select a site, then choose a Document Library (e.g., "Documents", "Shared Documents").
- Navigate to the folder you want and click Select.
- Click Sync Now to import the files.
Configuration Options
| Option | Description |
|---|---|
| Display Name | A friendly name for this sync (shown in your content library as a folder). |
| Sort Order | Name (A-Z), Name (Z-A), Newest first, or Oldest first. Determines which files are included when a folder has more than 200 files. |
Auto-Conversion
PowerPoint (.pptx, .ppt), Word (.docx, .doc), and Excel (.xlsx, .xls) files are automatically converted to PDF and then to images for display. You do not need to export slides manually. Just drop the PowerPoint into the synced folder.
Sync Limits and Frequency
- Up to 200 files per synced folder.
- Maximum 10 MB per file.
- Sync is available on demand with a 15-minute cooldown between syncs.
- Supported file types: images (JPEG, PNG, WebP, GIF, SVG, HEIF), videos (MP4, MOV), PDFs, and Office documents.
How Content Appears on Displays
Synced files appear in your Content library under a folder named with the sync's display name (prefixed with the site name for SharePoint). Create a dynamic playlist pointing at the folder to automatically display all files, including newly synced ones.
Google Drive
Sync images, videos, and files from Google Drive folders to your content library. HEIC photos are automatically converted to JPEG.
- A Google account with Google Drive access
- Admin role in DisplayCache
Connecting Google Drive
- Go to Integrations → Google Drive in the DisplayCache web admin.
- Click Connect Google Drive.
- You will be redirected to Google to sign in and authorize DisplayCache with read-only access to browse and download files.
- After authorization, you are redirected back to DisplayCache. The folder browser opens automatically.
Syncing a Folder
- Click + Add Folder to open the folder browser.
- Navigate through your Google Drive. You will see folders and a preview of supported files.
- Select the target folder by clicking Select "[folder name]".
- Give the sync a display name and choose a Sort Order.
- Click Sync Now to import the files.
Configuration Options
| Option | Description |
|---|---|
| Display Name | A friendly name for this sync (shown in your content library as a folder). |
| Sort Order | Name (A-Z), Name (Z-A), Newest first, or Oldest first. |
Sync Limits and Frequency
- Up to 200 files per synced folder.
- Maximum 10 MB per file.
- Sync is available on demand with a 15-minute cooldown between syncs.
- Supported file types: images (JPEG, PNG, WebP, GIF, SVG, HEIF/HEIC), videos (MP4, MOV), and PDFs.
- HEIC photos (common from iPhones) are automatically converted to JPEG.
How Content Appears on Displays
Synced files appear in your Content library under a [Google Drive] folder. Create a dynamic playlist pointing at the folder to auto-display new files as they are synced.
Canva
Import designs directly from your Canva account into the DisplayCache content library. Import as PNG (static image) or MP4 (animated video). Each user connects their own Canva account.
- A Canva account (free or paid)
- An admin must first enable Canva for your organization on the Integrations page
- Each user connects their own Canva account individually
Enabling Canva for Your Organization
- An admin goes to Integrations in the web admin.
- On the Canva card, click Enable. This allows all users in the organization to connect their Canva accounts.
Connecting Your Canva Account
- Go to Integrations → Canva.
- Click Connect with Canva.
- You will be redirected to Canva to authorize DisplayCache.
- After authorization, your designs are loaded automatically.
Importing Designs
- Browse your Canva designs in the grid view. Each design shows a thumbnail, title, and page count.
- Click designs to select them (or use Select All).
- Choose the export format:
- PNG (static) — best for still images and slides.
- MP4 (animated) — best for designs with animations or transitions.
- Click Import. The selected designs are exported from Canva and added to your content library.
How Content Appears on Displays
Imported designs appear in your Content library like any other uploaded file. Add them to playlists, set display durations, and assign to devices. Multi-page designs import all pages as separate content items.
Weather
Display current weather conditions on Smart Display widgets. Weather data comes from OpenWeatherMap and refreshes every 15 minutes.
- A free OpenWeatherMap API key from openweathermap.org
- Your location's latitude and longitude coordinates
- Admin role in DisplayCache
Getting an API Key
- Go to openweathermap.org and create a free account.
- Navigate to your API keys page and copy your key.
- Note: New API keys can take up to 2 hours to activate after creation. If you get an authentication error, wait and try again.
Connecting Weather
- Go to Integrations → Weather in the DisplayCache web admin.
- Enter your API Key.
- Enter the Latitude and Longitude of your location. You can:
- Click Use My Location to auto-detect your browser's location.
- Look up coordinates at latlong.net or Google Maps (right-click a location).
- Click Connect. DisplayCache will test the API key before saving.
Using Weather on Displays
Weather data is available as a widget in Smart Displays. It does not create a standalone content item.
- Go to Content → New Smart Display.
- Add a Weather widget to the layout.
- Position and size the widget wherever you want on the screen.
- The widget shows current conditions (temperature, description, weather icon) for your configured location.
- Data refreshes every 15 minutes automatically.
What Data Is Shown
- Current temperature in Fahrenheit
- Weather condition (sunny, cloudy, rain, snow, etc.)
- Weather icon matching the current conditions
Need more help?
Email us at hello@displaycache.com and we will get back to you within one business day.